Most people clean the toilet bowl regularly but completely forget about the tank behind it.
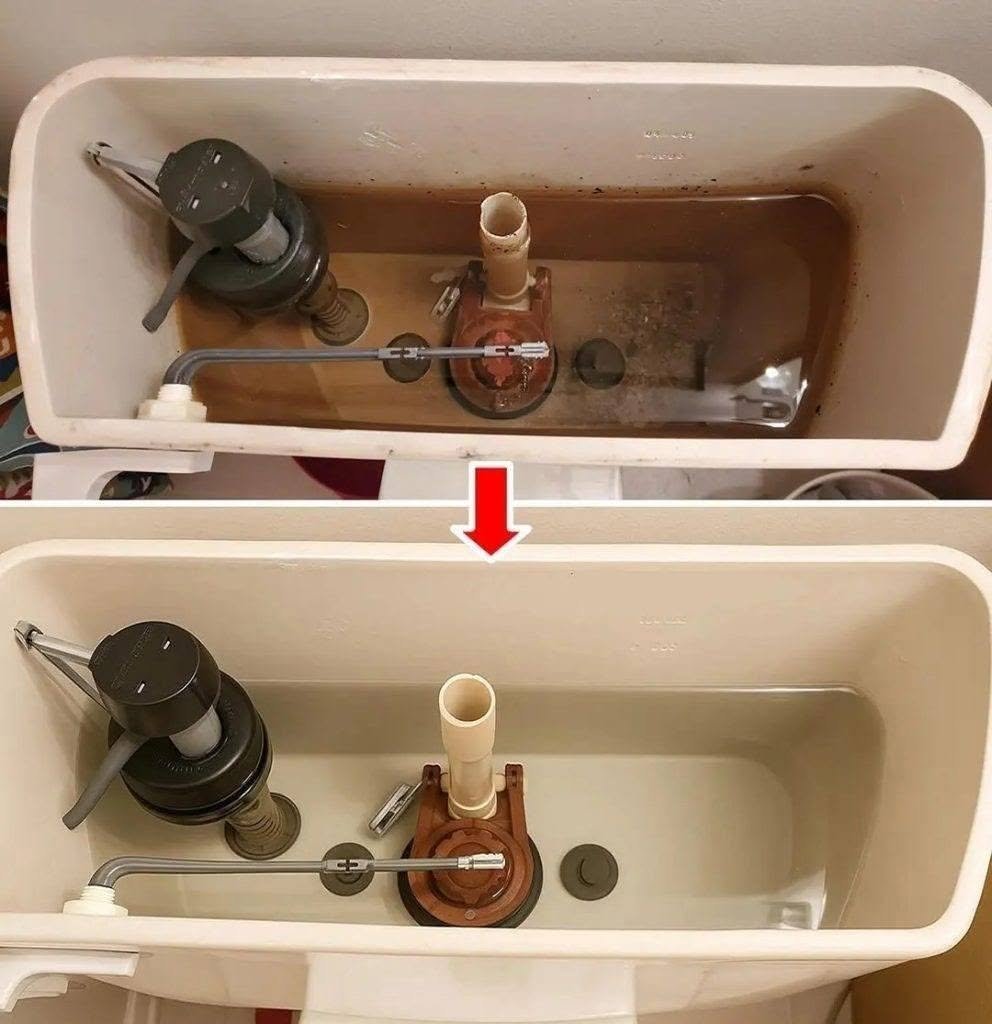
Over time, mineral deposits, rust, sediment, bacteria, and grime can collect inside the tank. A dirty tank can even affect the appearance and performance of your toilet.
The good news? Cleaning it doesn’t have to be difficult.
Here is a simple step-by-step method to get your toilet tank looking fresh again.
Why Should You Clean the Toilet Tank?
Every time you flush, the water stored inside the tank enters the toilet bowl.
A neglected tank may develop:
Brown or rusty-looking deposits
Mineral buildup
Slime or residue
Sediment at the bottom
Stains around the components
Unpleasant odors
Grime around the flapper and valve
In areas with hard water, mineral deposits can accumulate particularly quickly.
What You’ll Need
You don’t need expensive products.
Gather:
Rubber gloves
A sponge or soft scrub brush
An old toothbrush
A bucket or container
White vinegar
Clean water
A towel or rag
For stubborn mineral buildup, a commercial bathroom descaler can also be used according to its label.
Step 1: Turn Off the Water
Find the small shutoff valve on the wall or floor near the toilet.
Turn it clockwise until the water stops flowing.
Then flush the toilet.
This will empty most of the water from the tank and make cleaning considerably easier.
Step 2: Remove the Tank Lid
Carefully lift off the tank lid and place it somewhere safe.
Take a moment to look inside before touching anything.
You’ll see components such as the fill valve, flush valve, flapper, overflow tube and other hardware.
Don’t force or bend these parts. Some toilet components are relatively delicate.
Step 3: Remove the Remaining Water
If there’s still a significant amount of water in the tank, use a sponge or small container to remove it.
Place the dirty water into the toilet bowl.
Once the tank is mostly empty, you’ll be able to see the buildup on the bottom and around the components more clearly.
Step 4: Start With Gentle Cleaning
Use a sponge or soft brush to remove loose dirt and sediment.
For corners and around fittings, an old toothbrush can be very useful.
Avoid aggressively scraping plastic or rubber components because scratching or damaging them can cause leaks or premature failure.
Step 5: Tackle Mineral Deposits With Vinegar
For ordinary mineral deposits, white vinegar can help dissolve some of the buildup.
Soak a cloth or sponge in vinegar and apply it to affected areas. Let it sit for several minutes before gently scrubbing.
For removable, non-sensitive parts, you can sometimes soak them separately in vinegar.
However, don’t assume every toilet component is compatible with prolonged exposure to acidic cleaners. Follow the toilet manufacturer’s recommendations when possible.
Step 6: Rinse Everything Thoroughly
After cleaning, wipe the surfaces with clean water.
You don’t want large amounts of cleaning solution remaining inside the tank.
Remove any loosened sediment or debris from the bottom.
Step 7: Turn the Water Back On
Turn the shutoff valve counterclockwise to restore the water supply.
Allow the tank to refill.
Once it’s full, flush the toilet and check that everything is working correctly.
Pay particular attention to the area around the toilet’s components and supply connection for any signs of leaking.
A Very Important Warning About Bleach
You may see online cleaning hacks recommending bleach inside the toilet tank.
It’s best to avoid casually pouring bleach into the tank.
Bleach can damage certain rubber components over time, potentially contributing to deterioration of parts such as the flapper and seals.
Even more importantly, never mix bleach with vinegar, acids, ammonia, or other cleaning products. Dangerous chemical reactions can occur.
If you use a commercial toilet-tank cleaner, follow its instructions carefully and never combine different cleaners.
How Often Should You Clean the Tank?
There isn’t one universal schedule.
For a relatively clean toilet with normal water quality, inspecting the tank every few months is reasonable.
If you have hard water or notice:
Brown deposits
Heavy mineral buildup
Sediment
Slow or inconsistent flushing
Components becoming dirty
you may need to clean and inspect it more frequently.
Don’t Forget the Toilet Components
Cleaning the tank is also a good opportunity to inspect the parts inside.
Check the:
Flapper for deterioration or cracks
Fill valve for proper operation
Overflow tube for damage
Flush valve for buildup
Supply line and connections for leaks
If a rubber component looks cracked, brittle or badly deteriorated, cleaning it won’t necessarily solve the problem—it may need replacement.
Can You Put Cleaning Tablets in the Tank?
Some products are specifically designed for toilet tanks, but be cautious with so-called in-tank drop-in tablets.
Certain highly concentrated chemical tablets can damage rubber and plastic components over time.
If you want to use a tank-cleaning product, choose one that is specifically labeled as safe for your toilet system and follow the manufacturer’s instructions.
The Bottom Line
A toilet tank can become surprisingly dirty even when the toilet bowl looks perfectly clean.
Fortunately, regular inspection, gentle scrubbing and appropriate descaling can remove much of the buildup and help keep the flushing mechanism working properly.
You don’t need a complicated cleaning hack—just a little time, the right tools, and some care around the toilet’s mechanical parts.
And remember: never mix cleaning chemicals, especially bleach and acidic products such as vinegar.